17 Gallery Wall Ideas for the Living Room on a Dime
The first gallery wall I ever hung looked like a crime scene. I am not exaggerating. I had hammered seventeen nails into the plaster, the frames were crooked, and my husband walked in, tilted his head, and said, “Is it supposed to lean like that?” I have been collecting Gallery Wall ideas living room owners can actually afford, ever since that disaster, determined to figure out how to make one look good without spending a fortune or destroying my walls a second time.
Here is what I learned: a great gallery wall is not about expensive art. It is about arrangement, a little courage with a hammer, and knowing which cheap materials look like a million dollars once they are in a frame. These are 17 gallery wall ideas for the living room on a dime, and I have personally tried most of them. Every idea tells you the real cost and the real time. By the end, you will have a wall that looks collected and intentional, and you will not have cried once.
1. The Thrifted Frame Treasure Hunt

Start at the thrift store, not the art store. Frames are the cheapest part of a gallery wall if you buy them secondhand, and mismatched frames actually look better than matching ones. I spent one Saturday morning digging through the frame bin at my local charity shop and came home with nine frames for $8 total. Clean the glass with vinegar and water, pop out whatever sad motivational poster is inside, and spray paint any chipped ones in one unifying colour. Lay them all on the floor first and play with the arrangement for a good twenty minutes. My mistake the first time was hanging straight from the bag, and I ended up with a lopsided mess that took twice as long to fix.
Cost: ~$6–12 | Time: 1 weekend morning
2. Black-and-White Photo Grid

Printing your own photos in black and white is the fastest way to make a gallery wall look expensive. Colour photos from different years clash, but black and white unifies everything instantly. I printed twelve 4×6 photos at the drugstore for about $8 and put them in identical cheap black frames from the dollar store. Arrange them in a tight grid with two inches between each frame, and measure with a ruler, not your eyeball. I tried eyeballing it once and the whole grid drifted downhill to the right. A grid looks clean, modern, and deliberate, and nobody will guess the frames cost a dollar each.
Cost: ~$8 | Time: 1 hour
3. Wrapping Paper as Art

Some wrapping paper is too pretty to throw away, and it makes shockingly good wall art. I saved a roll of cream paper with a gold botanical print from Christmas and framed six squares of it in white frames. It looks like expensive wallpaper panels. Cut the paper slightly larger than the frame opening, smooth it flat with your hands, and secure the back with tape. Look for paper with repeating patterns rather than holiday characters. I keep a drawer of pretty paper now and swap the art seasonally, which means my gallery wall gets a refresh four times a year for basically nothing.
Cost: ~$3–5 | Time: 30 minutes
4. Vintage Plate Gallery Wall

Plates on the wall sound like your grandmother’s dining room, but done right they look fresh and collected. I bought six mismatched blue-and-white plates at an estate sale for $10 and hung them with adhesive plate hangers. Mix sizes and patterns, keep the colour family consistent, and arrange them in a loose cluster rather than a rigid row. Use a paper template first: trace each plate on kraft paper, tape the papers to the wall, and adjust until it feels balanced. My first attempt skipped the template step and I put four holes in the wall for one plate. Templates are not optional, trust me.
Cost: ~$10–15 | Time: 45 minutes
5. Kids’ Art in Grown-Up Frames

My daughter’s crayon drawings were piling up on the fridge, and framing the best ones turned clutter into the sweetest gallery wall. Pick the drawings with the boldest colours, trim them to fit standard frame sizes, and use matching white or black frames so it reads intentional. I framed five of her paintings in identical frames and guests always stop to look at them. It costs almost nothing and it makes the kids feel like real artists. I tried this with cheap colourful frames first and it looked chaotic; matching frames are what make children’s art look like a curated collection.
Cost: ~$12 | Time: 20 minutes
6. One Mirror Mixed Into the Frames

Adding a single mirror to your gallery wall bounces light around and makes the whole arrangement feel bigger. I found a round rattan mirror at a thrift store for $8 and placed it slightly off-centre among my frames. The rule is one mirror only, and keep it roughly the same scale as the other pieces. Hang it at the same height as the centre of the arrangement so it feels integrated, not random. My living room faces north and gets gloomy light, and that one mirror genuinely brightened the whole corner. It is the cheapest lighting upgrade I have ever done.
Cost: ~$8–14 | Time: 30 minutes
7. Fabric Remnant Gallery

The remnant bin at the fabric store is a goldmine for gallery wall art. I bought three fat quarters of block-print fabric for $4 total and stretched them over cheap canvases with a staple gun. Pull the fabric tight, staple the back starting from the middle of each side, and fold the corners like wrapping a present. The texture of fabric on the wall adds warmth that flat prints never do. I have since done this with a vintage scarf and a piece of my grandmother’s tablecloth, and those two pieces are my favourite things on the whole wall.
Cost: ~$4 | Time: 1 hour
8. Framed Calendar Pages

Those beautiful wall calendars go on clearance for pennies in January, and the pages are gallery-wall gold. I bought a botanical calendar for $2 after the holidays and framed six months of prints. The paper is thick, the images are professional quality, and you get twelve pieces of art for the price of a coffee. Trim the date strip off the bottom with a paper cutter for a cleaner look. I framed a whole year of a travel calendar for my hallway too, and people assume I bought the prints at a museum shop. I let them think that.
Cost: ~$2 | Time: 25 minutes
9. Picture Ledge Shelf Display

If the thought of hanging seventeen individual frames makes you sweat, use picture ledges instead. Two narrow shelves hold a whole gallery with zero measuring between frames. I mounted two ledges from the hardware store for about $20, then layered frames, small canvases, and a tiny plant along them. The beauty is you can rearrange everything in seconds without new holes. I restyle mine every few months when I get bored. The one thing to watch is depth: keep heavier frames at the back and lighter ones in front so nothing topples forward.
Cost: ~$18–24 | Time: 1 hour
10. Spray-Painted Frame Refresh

Mismatched thrift frames look instantly cohesive with one coat of spray paint. I took a pile of brown, gold, and black frames and sprayed them all matte white, and suddenly they looked like a set that cost ten times more. Work outside or in the garage, lay down a drop cloth, and do two light coats rather than one heavy one to avoid drips. Let them cure overnight before handling. My mistake was rushing the second coat while the first was tacky, and I got a texture like orange peel. Patience is the whole trick with spray paint.
Cost: ~$5–7 | Time: 2 hours (plus drying)
11. Map Collection Wall

Old maps have a warm, storied look that suits a gallery wall beautifully. I framed a vintage map of my home state that I found at a flea market for $5, plus printed a few free antique maps from the library’s digital archive at home. Keep the frame style consistent and let the maps be the variety. I arranged mine around the vintage one like a constellation. If you have travelled somewhere meaningful, a map of that place makes the wall personal in a way generic art never does. Mine includes the city where we got married, and I smile every time I walk past it.
Cost: ~$0–6 | Time: 40 minutes
12. Pressed Botanical Prints

Pressing leaves and flowers from your own garden costs nothing and looks like something from a fancy stationery shop. I pressed fern fronds and eucalyptus sprigs between heavy books for two weeks, then floated them on white cardstock inside glass frames. The key is picking flat specimens and pressing them fully dry, or they will brown inside the frame. Arrange one stem per frame for a minimal look, or cluster three small frames together. My fern prints have lasted two years without fading because I kept them out of direct sun. Free art that looks this good feels like cheating.
Cost: ~$7 | Time: 1 hour
13. Postcard Grid Wall

A tight grid of postcards is one of the cheapest gallery walls you can make, and it tells a story. I collected postcards from every trip we have taken, bought a few vintage ones at a flea market for 50 cents each, and mounted them in a grid with washi tape directly on the wall. No frames needed. Space them evenly using a ruler and a level, and stick to one tape colour for cohesion. I used kraft washi tape and it looks warm and intentional. When we travel now, the first thing I hunt for is a postcard for the wall. It has become a lovely little tradition.
Cost: ~$5 | Time: 35 minutes
14. Empty Frames as Sculpture
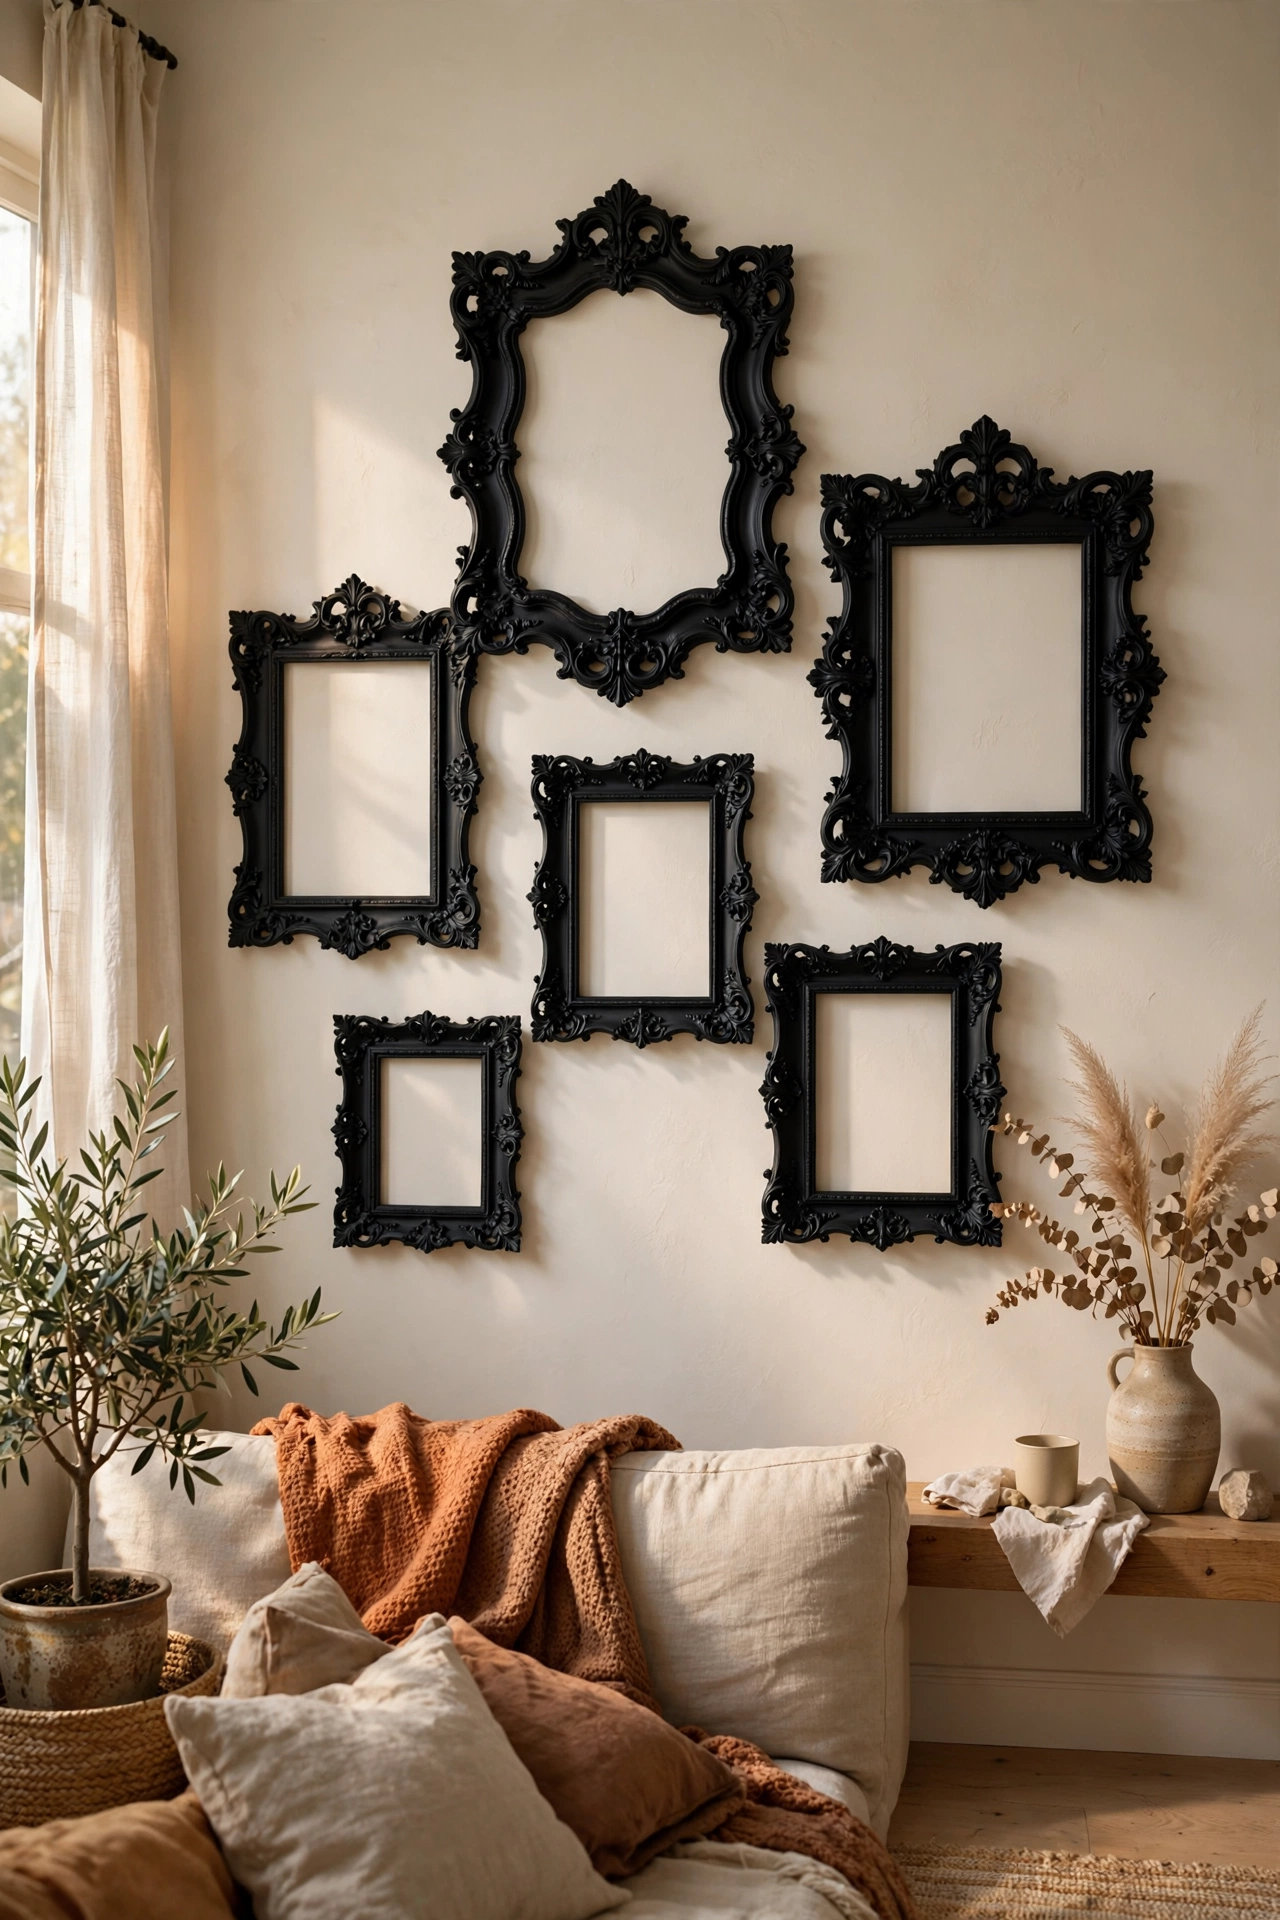
This one sounds strange until you see it: hang beautiful empty frames with nothing inside them. The frames themselves become the art, and the wall colour shows through like a painting. I hung five ornate thrift-store frames, spray painted matte black, in a cluster on my pale wall. It looks sculptural and modern. This works best with frames that have interesting shapes or carved details. I was sceptical when a friend suggested it, but it is now the most complimented part of my living room. Sometimes the boldest move is also the cheapest one.
Cost: ~$9 | Time: 30 minutes
15. Clipboard Gallery Wall

Clipboards make the most practical gallery wall because you can swap the art in seconds. I bought six wooden clipboards for about $10, hung them in two rows, and clipped in prints, photos, and my kids’ latest drawings. When I get bored, I just unclip and switch. Sand the clipboards lightly and stain or paint them to match your room. Mine are stained a warm walnut and they look far more expensive than they were. This is perfect if you love changing things up, because the wall is never finished, and that is the whole point.
Cost: ~$10–13 | Time: 25 minutes
16. Book Page Statement Wall

An old damaged book from the thrift store can cover a whole wall section for a pound or two. I bought a falling-apart classic for $1, carefully removed the pages, and arranged them in a tight grid with removable adhesive strips. The aged paper has a warm tone that looks incredible against a coloured wall. Use books that are already damaged, never a good copy, and stick to pages with interesting typography. I did this on the wall behind my reading chair and it feels like sitting inside a library. Guests always ask where I had it printed.
Cost: ~$1–3 | Time: 50 minutes
17. Seasonal Swap Frame System

Build your gallery wall once, then change the art with the seasons. I keep a set of frames with easy-open backs and a storage box of seasonal prints: botanicals for spring, beach scenes for summer, warm landscapes for autumn, and snowy scenes for winter. Swapping takes twenty minutes and the whole room feels new. Print seasonal images at home or collect free printables online. I started this two years ago and it is the single best decorating habit I have. The wall never gets stale, and each season feels like a little celebration when the new art goes up.
Cost: ~$15 | Time: 20 minutes
Gallery Wall Questions, Answered
How do I hang frames without making a million holes? Use paper templates. Trace every frame on kraft paper, cut them out, and tape them to the wall with painter’s tape. Live with the arrangement for a day, adjust freely, then hammer one nail through each template. You will halve your holes and your stress.
What if none of my frames match? That is actually ideal. Mismatched frames look collected and personal. Unify them with one spray-paint colour if they feel chaotic, or keep two finishes maximum, like black and natural wood. The art inside matters less than the overall balance of sizes.
How high should the centre of the gallery sit? Aim for 57 inches from the floor to the centre of the arrangement, which is roughly eye level for most people. Above a sofa, leave 6 to 8 inches between the top of the sofa and the bottom of the lowest frame. I measured wrong on my first wall and it floated near the ceiling like it was trying to escape.
Want more budget wall ideas? See (see also: 21-living-room-wall-decor-ideas-that-cost-almost-nothing) and (see also: 15-sage-green-living-room-decor-ideas-on-a-budget) for colours that pair beautifully with gallery walls. Found a favourite here? Save this idea to your living room board so it is waiting when you are ready to hang.
